Generating a high-quality 3D model using the Artec Leo Scanner
Author: Danilo Marco Campanaro - Last Update: 2023-11-15
Citation:
Campanaro, D. M. (2024). Generating a high-quality 3D model using the Artec Leo Scanner. Zenodo. https://zenodo.org/records/11186141
This document illustrates the procedure for obtaining a high-quality 3D model complete with textures, starting with a 3D scan of an object (in this case runestones) using the Artec Leo scanner.
The following steps will be explained in the tutorial:
- Scanning
- Processing of data
- Model creation
- Creation and application of textures
- Exporting the model
Overview of the scanner
Leo is a structured light scanner that emits a known light pattern and observes how it deforms to calculate the geometry of an object. It has a built-in NVIDIA graphics processor for real-time processing, so Leo does not need to be connected to a computer to scan. It is capable of capturing medium (20-50 cm) and large (50-200 cm) objects and surfaces.
Scanning
How to scan
Scanning objects is a straightforward process, however, it is essential to follow specific steps. This summary outlines the necessary steps for successful scanning:
- Make sure there are enough features to track.
- Always keep the surface in the middle of the screen during scanning.
- Look only at the screen, not at the object.
- Monitor the distance meter at all times.
- Don’t move the scanner too fast.
- Point scanner at the object from different angles, always move your wrist.
- More detailed instructions concerning the full procedure (it might slightly change depending on the object to be captured) can be found here.
Processing of data
For the data processing, this tutorial will make use of the Artec Studio which is a software developed by Artec 3D featuring tools for aligning, merging, and cleaning up 3D scan data to produce precise and comprehensive 3D models.
Once the data is acquired, it must be transferred to a personal computer. This can be accomplished using various methods:
- Copy the project using a shared network.
- Upload the project to Artec Cloud.
- MicroSD Memory Card.
For this tutorial we have used the third method (for the first two methods, please refer to the official guide):
- Copy data from device’s internal storage to SD card.
- Remove the microSD card from Leo.
- Insert the card into a microSD reader connected to the computer with the installed Artec Studio.
- Copy files to this computer.
- Open Artec Studio.
Select File → Import → Leo project. Navigate the folder tree to the required project (Figure 1)

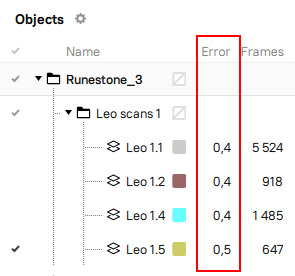
Maximum Error and Registration Quality
An essential factor to consider is the error, which indicates the quality of frame recording that comprises each individual scan. A higher value indicates less accurate alignment. The Artec scanner includes reference ranges for error, which are available here. For scans acquired with the Artec Leo errors ranging from 0.0 to 0.5 are deemed good, while those between 0.6 and 1.3 are acceptable, and errors above 1.4 are deemed unacceptable. It is recommended to eliminate frames with a value exceeding 0.5 (Figure 2) to ensure consistency. This procedure should also be repeated after Fine Registration and Global Registration are complete.
Editing Scans
Erasing Portions of Scans
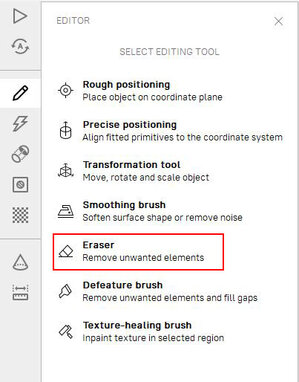
Various scans may show parts of surfaces that are not relevant to the object of our interest, such as the surface of a rotating table when 3D scanning a small object. We may need to remove these sections by going to:
Editor → Eraser (Figure 3)
Various methods are available for eliminating unnecessary points. For extremely regular surfaces, such as the turning table in the previous example, Base selection and Cutoff-selection may prove most effective. In this specific instance, however, the Lasso selection method was used (Figure 4). This option permits the creation of a customised selection either through freely outlining an irregular area using Ctrl+LMB or by releasing LMB (not Ctrl) and then selecting a desired shape by clicking.

Fine registration
Fine registration is a process created to accurately align captured frames. To perform a scan registration, simply mark the frames in the Workspace panel. Subsequently, it's critical to assess whether the error level has altered and, if necessary, eliminate all misaligned frames (labeled as "failed") or those with an error level exceeding the predetermined limit (Figure 5).

Alignment
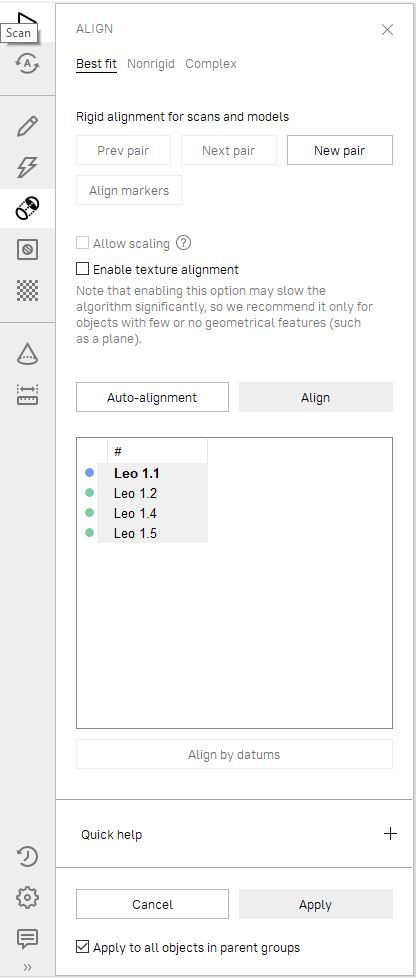
The process of aligning brings together the individual scans. There are different methods to align scan groups in Artec Studio. For a complete explanation, please refer to this guide. For the specific instance, we have decided to use the auto alignment method as it is the easiest approach (Figure 6). Its advantages include the ability to align multiple scans at the same time without the need for specifying points. The only downside is that the scans being aligned have to have overlapping areas of at least a minimum size. These are the steps to be followed:
- Mark the scans for alignment.
- Select the Best fit type in the Align panel.
- In the Points option, switch ON the Auto toggle, and click on Align.
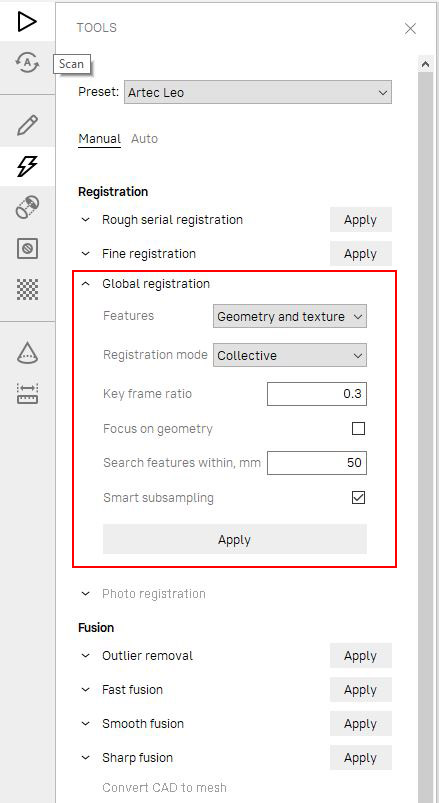
Global Registration
Once the scans are lined up, they must be registered with Global Registration (Figure 7). To do so, select all the aligned scans in the Workspace panel, then click Tools → Registration. Make sure to choose Global as the registration type in the Registration pop-up. Check the Preset field located on the Tools panel and make sure it displays the scanner you used for the selected scans (in this case Artec Leo). Leave the default setting as shown in the figure (the different parameters are explained in detail in this guide) and click Run.
Model Creation (Fusion)
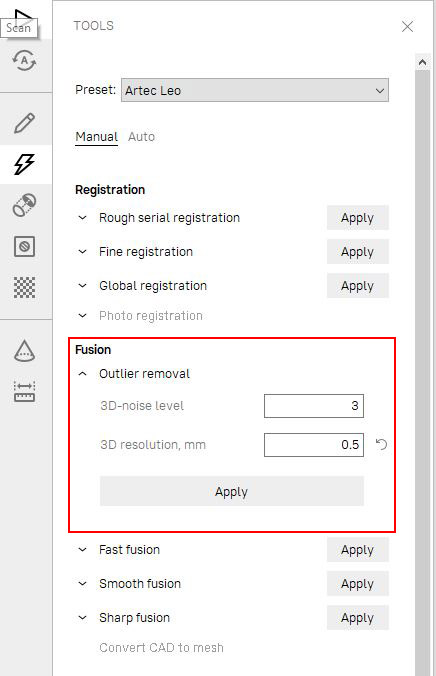
Outlier Removal
Before creating the models, it is recommended to remove any outliers that represent small, unconnected surfaces (Figure 8). Go to Open Tools → Fusion → Outlier removal. Here there are two parameters that can be changed: 3D-noise level 3D resolution 3D-noise level. It can be set to 2 for noisier surfaces or 3 for less noisy surfaces. In this specific case, we have applied the default setting of 3. 3D Resolution. This refers to the resolution of the Fusion process that will be conducted later, which is dependent on the type of scanner used during acquisition. For this particular case, we utilized the default value of 0.5. Click Apply.
Fusion
Once the model has been cleaned, we can proceed with the creation of the fusion (or the model) using Tools → Fusion Several options exist depending on the type of scans (refer to the Artec guide for a comprehensive description of the algorithm.
Three main types of fusion are available:
- Smart Fusion (smooth), for noisy data sets.
-Smart Fusion (sharp), for scans with fine details.
- Fast Fusion (legacy), which it gives fast results for large data sets.
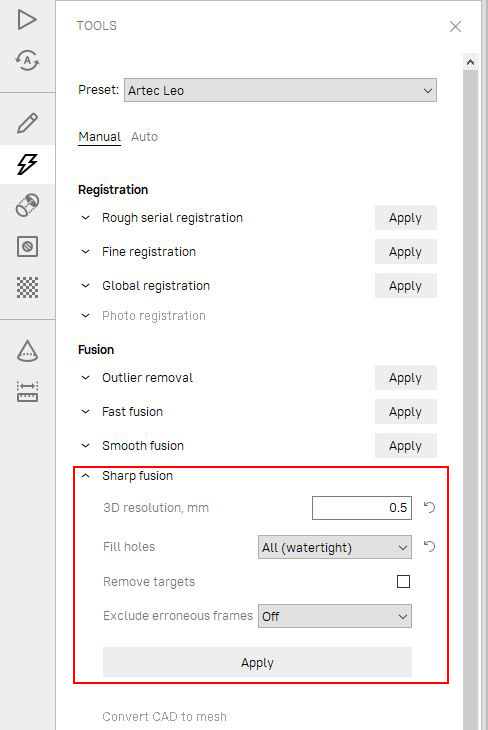
For the particular instance, the smart fusion was applied with the default value of 0.5 while activating the fill holes attribute - All(watertight) (Figure 9).
It is suggested to use the latter only if the scans cover most of the geometry and there are no alternatives to cover areas not captured by points (e.g., conducting a new scanning campaign). Apply the Fusion algorithm. A sharp fusion model should appear in the layers tab on the right.
Creation and application of textures
The sharp fusion model was created without any colour information. To add it to the model, we need to run the texture algorithm (Figure 10).
First we select the model we want to texture in the 'Select model to texture' box. Then we select the texture source. This can be a series of scans (which retains the colour information captured by the scanner) or a Photoset, which is a series of images taken for a specific purpose.
In this section we will examine both the techniques.
Color from scans
The scans associated with the fusion model appear in the "Select texture source" box. We can select one scan and add more by pressing CTRL+LBM. Once this is done, a texture destination should be selected. Two methods are offered:
- Preview (triangle map).
-Export (texture atlas).
Preview gives a quicker result, allowing you to evaluate the final effect of the textures on the model. A full description of the different parameters can be found here:
For this tutorial we will create a texture for export using the default values and resolution with the following steps:
- Select the required Output texture size.
- Click Apply to start the texturing process.
When the texture is ready, you can also adjust it if necessary (see the guide here).
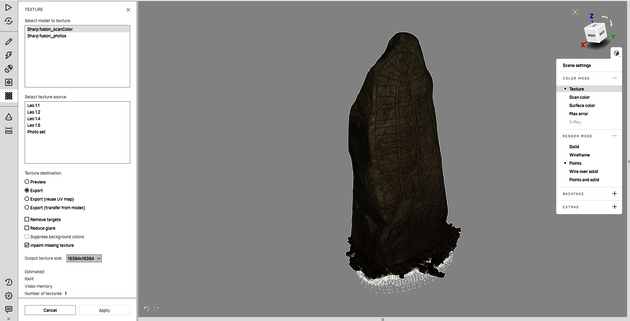
Photo Registration
The photo registration algorithm in Artec Studio allows textures to be applied to models using photographs. Using photos of the object, this algorithm projects textures onto fused models.
This sophisticated texturing method is effective for capturing intricate textures and greatly enhances models.
Taking photo
The following steps should be followed to use photo for the Photo Registration (for more details see also this article):
- Ensure that the object can be reached from all angles without obstruction.
- Keep the object still when capturing photos.
- Decide on a suitable distance for photographing the object, avoiding being too near or too far.
- Use a consistent focal length for all photos so that they can be properly aligned. Avoid altering focus or using auto-focus as it can affect registration. If different focus settings are necessary, organize photos in separate folders, import them individually, and register them separately. - Make sure the images are well-lit and adjust the white balance as needed.
- Avoid using a photo flash to prevent glare.
- Maintain a consistent camera orientation throughout the capture process and refrain from rotating the camera.
- When taking multiple photos, make sure to move the camera with a 66% or 2/3 overlap. Follow the rule that every point on the subject should show up in at least three photos.
Registration
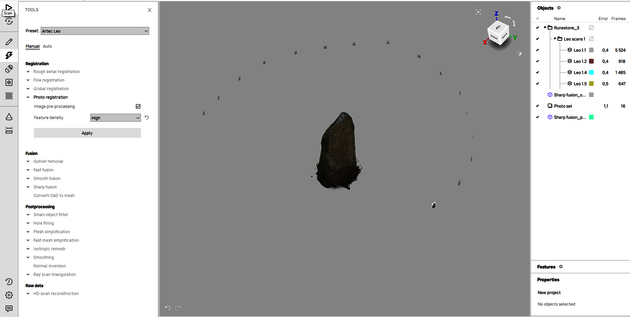
Go to Tools → Registration → Photo Registration
Select the Photo set the Fusion model and the related scans and apply the algorithm with default settings on (Figure 11).
- Define the Feature density is related to the number of feature present (e.g. upholstery would require higher settings).
- Tick Image pre-processing applies contrast to the images from the scanner. This is needed for Artec Eva and Artec Leo.
- Apply Texture creation Go to Texture on the left panel and follow the same procedure as in the previous paragraph “Color from scans” selecting Photo set in the Select texture source and then Apply.
Exporting the model
Select the Sharp fusion model you want to export in the quick toolbar on the right (layers) and then go to File → Export → mesh
Assign a path, a name for the model and a format and click OK.
